Monday, February 27, 2017

I Finally Did It!!

After having my Silhouette Cameo for almost 2 years now, and being petrified of that silly little machine, last night I bit the bullet!  I pulled up a YouTube video on how to use it, watched that whole thing and then proceeded to make A2 File Folders that I plan to  store my embossing folders in.  I managed to get 12 done for the large folders and now have to emboss them so I know which embossing folder is on the inside. At first I thought I was in trouble because I had bought 8.5x11 paper at Michael's in shades of Pink and it didn't look like the file was going to fit the paper.  But after turning the file around (I was so proud of myself after figuring that out!) I was able to get one file folder out of one piece of cardstock. Whew!!!

After that I felt pretty confident, and since I have downloaded a ton of Silhouette files, I decided to make a quick card.  I was impressed with the intricate cuts the Cameo made and so was my husband.  I have a feeling when I get back from IA Sunday, I'll be giving this machine a good workout to make up for all of the time it sat there intimidating me! LOL! I'm working on 3 wedding albums so I'll be cutting out lots of wedding item files ahead of time and then adding them to the albums as I go along.  

I am so glad I finally tackled this obstacle - and am really embarrassed to have been afraid to use it! I do have 2 Cricut machines after all and it turned out to not be much different from those. And of course the YouTube video helped a lot also :)

Also, just and FYI - I won't be posting again until Sunday, March 5.  I have an appointment with my oncologist in Iowa and won't be up to playing or posting.  So until Sunday, I hope everyone has a Scrappy Happy Week! 

Joyce


File Folders for my Embossing folders in various shades of Pink

My very first card made with my Silhouette Cameo.  It's no glued down very well bu I was impressed with the cuts it made!

Tuesday, February 21, 2017

More Organizing Done!

I was able to get some more organizing done over the weekend.  I even managed to get 1/3 of my counter cleaned off!! Now I finally have room for my Zutter Cutter. One of the things you don't see that I also organized what a ton a photos!  My order from Avery Elle also came Friday so I can now start organizing my dies, clear stamps and embossing folders. I've decided to do mine the way Jennifer McGuire does hers. I really like that you can see what is in the clear envelopes plus it takes up so much less space than the way I was originally planning on using. If you'd like to see her organization tips here is a link to her blog:  www.jennifermcguireink.com/  and also a link to a tour of her scrapbook room that tells how she stores and organizes everything:  www.jennifermcguireink.com/2008/11/my-scraproom-part-1.html   You'll be converted in no time! I know I was!


 This the die cutting area at the end of the counter that runs the length of the room. Mike put the Recollections shelf from Michael's up today - it used to be where the 3rd set of shelves now reside. I have all my Cricut Cartridges, Sizzix dies and Accu-Cut dies stored in the wire shelves. In the Shelf above are ribbons, embellishments from Queen & Company, Glitter, Stamp Re-Inkers and other various items for making cards with. The blue items in the black racks to the side on the counter are also Sizzix dies.


The last set of shelves are FINALLY organized! And next to these shelves is one of the 2 small cubes Mike put up for me today. Top row has my Quick Kutz Die Cut Maker along with a couple of other LARGE scrapbooking tools. The two bags on the opposite end of the top shelf hold other cutting things, plus my Crop-a-dile and a Stapler. The Hello Kitty holder in the middle was actually a Nail Polish Display holder that I plan to use for something - just have to figure out what! LOL! The 2nd shelf has all 3 sizes of my Xyrons, my small Sizzix embossing and cutting machine, my Sizzix Sidekick, the Zutter binding machine and my Gypsy for my Cricut machine. The bottom shelf has my large Cricut machine that cuts 12x12 paper, my original Cricut machine that uses 8 1/2 x 11 sized paper and my Cricut Jukebox and tool kit. Below the shelves, next to the blue dies is my Zutter Cutter that will cut paper without having to measure it - just put the paper in and roll it out cut!

Wide angle view of the middle and last set of shelves with the 2 small cubes mounted on the wall in between hem. On the last set of shelves, on the middle shelf he first pink basket holds all of my Hello Kitty Smash Book and scrapbooking items, all except the Hello Kitty scrapbooking paper.


This is 1 of the 2 slanted half cubes we got for 70% off each at Michael's. I wasn't sure what to store in them when I got them, but I'm finding them handy for extra blades, decorative paperclips, idea cards, rub on letters and other small misc items.


This is the 2nd of he slanted cubes and right now I have Staz-On Ink Pads in the first row and he 2nd and 3rd rows are my Tim Holtz Ranger Distress Ink Pads. I'm not sure if his will be their finally home or not. I still need to put a dot with the ink color on the outside of each ink pad along with it's name.


That's pretty much it for today.  I have a huge list of things I'm hoping to accomplish so I need to get down to the scrapbook room. Hopefully I will get all of my inks labeled and more stamps and dies put away.

Have a scrappy day!
Joyce 


Saturday, February 18, 2017

Project Life App

I did one album the Project Life way when my MIL passed away - it was a tribute album to her.  It turned out beautifully and I was able to do her whole life in one album in 24 hours. And then it seems like I haven't scrapped since then and that was either two or three years ago.  No mojo and too much sickness.  Last week I discovered the Project Life App for my phone and have already done 27 layouts!! That is a world record for me because I am the slowest scrapper ever.  I'm really liking the Project Life App because no matter where I am, I can do some scrapbooking and now I can even see myself getting caught up on my digital pictures one of these days - I couldn't even imagine that before! So do any of you out there use the Project Life App also? And do you like it as much as I do?  If you do use the App, I'd love to see some of your layouts also so feel free to share them with us here.

 I'm attaching some of the layouts I've done with the app. Some are completely finished including journaling (which I hardly ever do on regular layouts), some will be hybrid layouts because I want to add some embellishments and my own handwriting and some I still need to journal but that is all that is left to do on them.  I hope you enjoy the ones I've picked to share. Please be sure to leave some comments so I know what you think of them. :)

My Niece and her Husband at our House for Christmas Cocktails


My cousin and 2 of her 3 daughters at a Christmas program and at home

My 9 story Lundby dollhouse with a double yard decorated for Christmas

My cousin and I exchanging handmade gifts at our house at Christmas 
Busha Bean  and our Christmas Tree in the Living Room

Busha Bean with her goodies from her stocking

Hazel B is more cautious with her goodies from her stocking

Thanksgiving 2016 at our house

Halloween decorations in Gobles

Sasha Marie (RIP) playing outside


Until next time, Have a Scrappy Weekend!
Joyce


Friday, February 17, 2017

Happy Friday!!!

I hope everyone is having a great Friday.  I'm stuck here in bed with either a cold or allergies - I'm not sure which but hoping I'll feel better by tomorrow.  So how many of you have used Wink of Stella Glitter Brushes by ZIG?  I used them for the first time Wednesday at the Card Cafe and immediately fell in LOVE!!!  I came right home, logged into Amazon and found 2 sets I thought I'd like, and ordered them.  Well guess what came in today's mail?!  Yes, my new Wink of Stella Brushes.  

The sets I ordered were Elegant and White Christmas.  The Elegant set contains Glitter Silver, Glitter Clear and Glitter Black. The White Christmas Set  contains Glitter White, Glitter Red and Glitter Dark Green. I followed the directions for priming them and getting them going without any problems and they flow very smoothly. The Red is not a deep red, just red. The Dark Green has somewhat of a gold shimmer to it, which I really like. And the White is very opaque.  In fact I think you would have to go over whatever you are using it on more than once to get it show. The Black was really nice except my tip had a hair at the end that was longer the the rest of the brush but a snip of the scissors took care of that. The Silver was, well, Silver and nice.  But my favorite is the Clear.  You could use the Clear on anything you want to give some shimmer to. I can see that I'll be ordering more Clear pens than any of the other colors. 

Speaking of other colors....These Wink of Stella Brushes come in quite a few more colors, both alone and in 3 packs on Amazon.  I've already got a wish list of these fun brushes.  

I'm adding a picture of a tag I used the brushes on to show how the colors actually show up.  Unfortunately it's really hard to get a good angle that shows all the shimmers. But hopefully this will help everyone get an idea of what these fun brushes will do. By the way, please excuse my coloring out of the lines on the tag! It's hard to color and sneeze all at the same time! 

If you order the 3 pack brushes, this is how they come.

I was able to use all 6 colors on this one tag.  The Silver outlines the bubble, the White is drawn over the red around the bubble, I used the Red on the word Magic, the Dark Green on Christmas, Black on the small words and the Clear I used over the Believe since I didn't order a gold brush.  Not too bad for a first try. 


Have a scrappy weekend. I'll be back on Monday!
Joyce

Monthly Card Cafe Fun

Wednesday was Card Cafe day at my friend, Jeanne's house. She's a Stampin' Up Demonstrator and holds Card Cafes twice a month (this month she's holding a third one - YAY for me!)  Her Facebook page is listed to the left under my Favorite Sites if you're local to South Haven and would like join in the fun.  Anyway,  I always look forward to going to these but last month I was sick and had to miss.  Luckily for me she had leftovers so I tried my best to get last month's cards done AND this month's. But 17 cards was too many for even me.  I did manage to get 9 cards completed and I really like how they all turned out. I'll get the other ones done at her third cafe this month.  The thing I like most about these cafe's are that I get to use stamps that I would NEVER consider buying and then find out that I really do like them! The other thing I like is that she teaches us new techniques and even though I've been stamping for almost 30 years, there are always new techniques coming out and even this old dog has learned some new tricks :)

 My favorite cards from Wednesday's cafe  are the dancing ladies, the card with the bokah background and the dragonfly card. I will definitely be ordering the Dancing Ladies Stamps, the Bokah paper pack and the thinlit used to make the delicate strip across the middle of he Bokah card. It might be cheaper if I just signed up to be a Stampin'Up Demonstrator! LOL! So here are the cards I finished. Feel free to let me know which ones are your favorites.  I know we all have different tastes so please let me hear from you.


That' basically all for today. Tomorrow it's back down o the scrapbook room to keep organizing it. It's really taking shape and I'm so happy about that. Soon I can stamp and scrap in my own little room! Til next time!

Happy Scrapping and Stamping!
Joyce

Thursday, February 16, 2017

Finally Getting Back into the Swing of Things

After seeing the date of my last post to my blog, I am hanging my head in shame.  Although I do have a very good reason for not being able to keep my blog updated, I'm still quite embarrassed.

Recently I joined a wonderful Facebook Group for organizing your craft rooms and it has really given me the incentive and some great ideas to get my scrapbook room back on the right track and .... gasp! It may even be done by the end of March of this year.  At the very latest, I'd say April.  As with everything in my life, deadlines are ruled by my cancer and how I feel each day.  But I've been working very hard on organizing things in my room and would like to share some photos of what has been done so far. It may not look like a lot but the before pictures that I did take look like a hurricane had gone thru my room. So here are some pictures of before and after shots.  

Before:
Back corner of my room

Work Table and Chair (chair from IKEA, table is a vintage 50's formica table)
My room as you walked into it before

These 3 photos are my room at it's worst. I had not idea where I wanted to put things plus my dollhouse collection somehow made it's way into my scrapbook room (they now have a room of their own!)


Paper Rack made by my husband with my Toby Keith Shrine on top of it! LOL!

Recollections organizer from Michael's that has been moved over my cutting station

Cutting station that has an Accu Cut machine, my Hello Kitty Cuttlebug machine and then all of my Cricut cartridges and dies underneath. This uni came from the Container store.

More storage as you enter my room. A storage cupboard, another paper rack made by my DH and them more cubes from Michael's that have been moved to a different area.

The items in the photos above have pretty much stayed the same except for the tower of cubes at the end of the paper rack in the last picture. The 1st photo is my paper storage rack that my husband made and also my Toby Keith "shrine"! LOL!  The Recollections shelf has been moved above my cutting station (picture 3) and in place of that shelf unit, we have added 3 more long shelves. 


I added an over the door rack to store my Washi Tape and some of my larger bottles of things in. I also plan on storing my ribbon in this but I still need to get a few more racks to add to it.

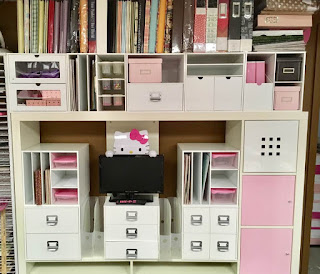
This is my Kallax Unit from IKEA that also ha Recollection cubes from Michael's in it.  The Cubes that were at the end of the picture 2 pictures up are now residing across the top of the Kalax unit.  All of the albums across the top are there just temporarily.
A closer look at how I have arranged things around the Hello Kitty TV.  The clear paper holders will house my Bazzill cardstock in color order.


This is just a regular storage cupboard from Menards.  I have all my Zutter Binder supplies in here.  Plus the tiered racks are actually for spices but I plan on putting wood mounted stamps on them.  I also have my Stampin' Up stamps in here  There is a lot of wasted space in the top so my husband is going to try to figure out how to add more shelves.

And now here are some of the updated things I've done and organized over the last week or so.  Which is quite a bit for that small length of time for me. Once I go going I didn't want to stop!  The following three sets of shelves cover one completely wall that runs the length of my scrapbook room.


These shelves will eventually hold my small Cricut, Xyron machines, my Zutter Binder and any other large items used for scrapping.  The pink OTT light on the bottom shelf will be put on my scrap table eventually

I finished organizing this set of shelves about 1am Sunday. The top shelf has some vintage cameras and a fe photos I have taken and framed (I'm also an amateur photographer). The 2nd level of shelves hold a birdhouse that my niece made for me with Hello Kitt on the ends and zebra stripes on the sides, to represent my cancer. I also added a few photo frames which I have yet to fill. And I found the cute tins that decline in size with the fuzzy tops and bows last year around Valentines's day. The first one has all of my decorative scissors in it, the next size down has my creative memory writing pens, and the next one has Xacto knives, blending stubs etc in it.  The smallest one is still empty - suggestions for that one are welcome :)
This is the last set of shelves on that wall.  The top shelf has containers for small embellishments,which will probably be the last thing I organize since I seem to have them all over the room. The 2nd level I haven't quite decided what will go in all of the baskets.  Right now in the first basket I have my Hello Kitty Smash Book items,  And in the last basket I have handmade cards that are ready to send out. Now to figure out what to store in the large middle basket!  The bottom level I have buttons, flowers and ribbon all stored in glass Ball Canning Jar, arranged by color.  I go this idea from Pinterest (like a lot of ideas I've used)


Next are some misc storage items for the scrap area and also for the Hello Kitty Lounge area (on the other side of the 2nd large paper rack).  The lounge is in case I get tired or start to not feel good so then I can just lay down and rest on the windowless window seat my husband built in that area.

For some reason I'm not able to put captions with the next item so I'll just explain hem here. The first picture is 1 of my 2 Raskog carts from IKEA. I had my husband paint that pink also (in case anyone wonders what shade of pink it's Ballet Slipper and you can find it at Michael's and Hobby Lobby).  This cart is going to be for storing my metal dies, clear stamps and embossing folders.  I just ordered the Avery Elle envelopes that Jennifer McGuire uses (I'm a HUGE fan) and they should be here Friday so you can guess what I'll be doing this weekend!

The 2nd Raskog cart is for my Project life cards.  I did change it up since the photo.  I moved all of my cards to the top two tiers and now on the bottom tier have my Daily December albums and items to go in them, along with the Project Life punches - one square corner and one round corner.

The next photo is of he storage bin I got for Christmas to keep my paper scraps in sorted by color. I love that the handles are colored so it's such a no brainer!

Next is my glitter storage - I saw this on Pinterest and fell in love with the little salt shakers. They take up so much less room and look so elegant. I found mine at Tuesday Morning and also at Wal-Mart.  The Pink polka dot boxes they are in were found at Joann Fabric.

And last is my Copic storage. Before I had too many pens and they were floating all over the place and I was afraid I was going to lose some. This unit is going to be mounted on the wall between the 2nd and 3rd set of shelves on the long wall.  I have them all in numerical order according to their color chart. 


The next few items are things that will be in my Hello Kitty lounge area - more for decoration than anything else.


I got this at Target a couple of years ago as they were taking Valentine candy displays down.  I asked the lady if I could have it and since it didn't have a log on it she said sure. There were quite a few areas where the paper had been torn but I fixed that with some Hello Kitty Duct Tape. It even had attachments still in it to pop it into my pegboard

This is a small pegboard wall just around the corner from the windowless windowseat.  The 2 calendar on the wall are handmade - one was  class I taught and the other was a kit.I found the light up HK letters at Hobby Lobby and HAD to have hem.  And of course my Hello Kitty cuddle pillow!

I found this cute metal board at IKEA and had my husband spray paint it pink to match my pink and brown room.  It just has some mementos and things I've made in the past on it.

So that's it's for this update. Sorry it's so long. I'll be back downstairs organizing tomorrow so hopefully the next update won't be as long or as late.

Happy Scrapping Y'all!
Joyce